Sunday, July 31, 2011

Sweet Treats Birthday shape card

Everything on this card was cut from Sweet Treats. The shape was cut @ 5.5 and the wording @ 1.75


Thanks for looking!

Saturday, July 30, 2011

Pop up Neighborhood thank you

A super fast card using Pop Up Neighborhood. The lawnmower was cut @ 3.5, the grass was cut @ 1 from Planting Schoolbook and the Thank you was done in cricut markers @
3.5 from Lacy Labels.


Thanks for looking!

Friday, July 29, 2011

Kates ABCs

Another cute card using Kate's ABCs. All the layers were cut @ 4.5. I used yellow stickles, a violet Viva Decor pen and a sizzix embossing folder on her dress that I sanded afterwards.


Thanks for looking!

Thursday, July 28, 2011

Watermelon card

Every year during our family reunion we invite a family friend. His birthday is that week, so we always cut a watermelon in half and stick candles in it and sing happy birthday to him. This year I decided a watermelon card would be cute for his 33rd birthday.


Recipe:
A Child's Year: watermelon from the tag feature, 1.98
Sweet Treats: numbered candles, cut @ 2

I used my Gypsy and welded a rectangle to the watermelon to get the card shape.

I used orange stickles on the flame and black enamel for the seeds.

Thanks for looking!

Monday, July 25, 2011

July LO

As those who have been following my blog know, I make a one page LO for every month of the year to keep my scrapbook organized. For July, I used mostly Stand and Salute except for Black letter, which I used for the date.


The background paper was K&Company's Americana stack.
Fireworks was cut @ 3
Good Bless America was cut @ 3.75
Liberty Bell was cut @ 2.375
The Eagle was cut @ 2.5
July 2011 was cut @ 2.639

Thanks for looking!

Sunday, July 24, 2011

Happy Parent's Day!

This year for my Mom I made a purse for her. Using TBBM, I cut purse #47 @ 11.5 x 20.235. I used the red double sided tape from Provo Craft to put the purse together.


From Forever Young I cut the 4th flower on the bottom row at 5.5. I used a cuttlebug folder (swirls) on the two middle layers. I used my white gel pen on all the layers to add faux stitching. I used a red velvet ribbon for the handle.


I added 10 various cards and envelopes to the inside. I will add some velcro to hold the flap down before I give it to her. :)


For those who want to know how this day came about, from Wikipedia:
"In the United States, Parents' Day is held on the fourth Sunday of every July. This was established in 1994 when President Bill Clinton signed a Congressional Resolution into law (36 U.S.C. § 135) for "recognizing, uplifting, and supporting the role of parents in the rearing of children." The bill was introduced by Republican Senator Trent Lott. It was supported by members of the Unification Church which also celebrates a holiday called Parents' Day, although on a different date. United States Supreme Court Justice Ruth Bader Ginsburg has said: "Replacing Mother's Day and Father's Day with a Parents' Day should be considered, as an observance more consistent with a policy of minimizing traditional sex-based differences in parental roles."

Thanks for looking!

Thursday, July 21, 2011

CHA Make n Takes

Yesterday I went to CHA with Bobbi Jo from sweetsassydiva.com! It was my first time ever going to CHA and I have to say I had such a great time. A HUGE thanks to Bobbi Jo for bringing me along!!

At the Provo Craft press event, we made a badge frame. The frame was cut from the Fancy Frames project cartridge. The flowers were from the Flower Shoppe project cartridge.


I love the way the flowers turned out!!


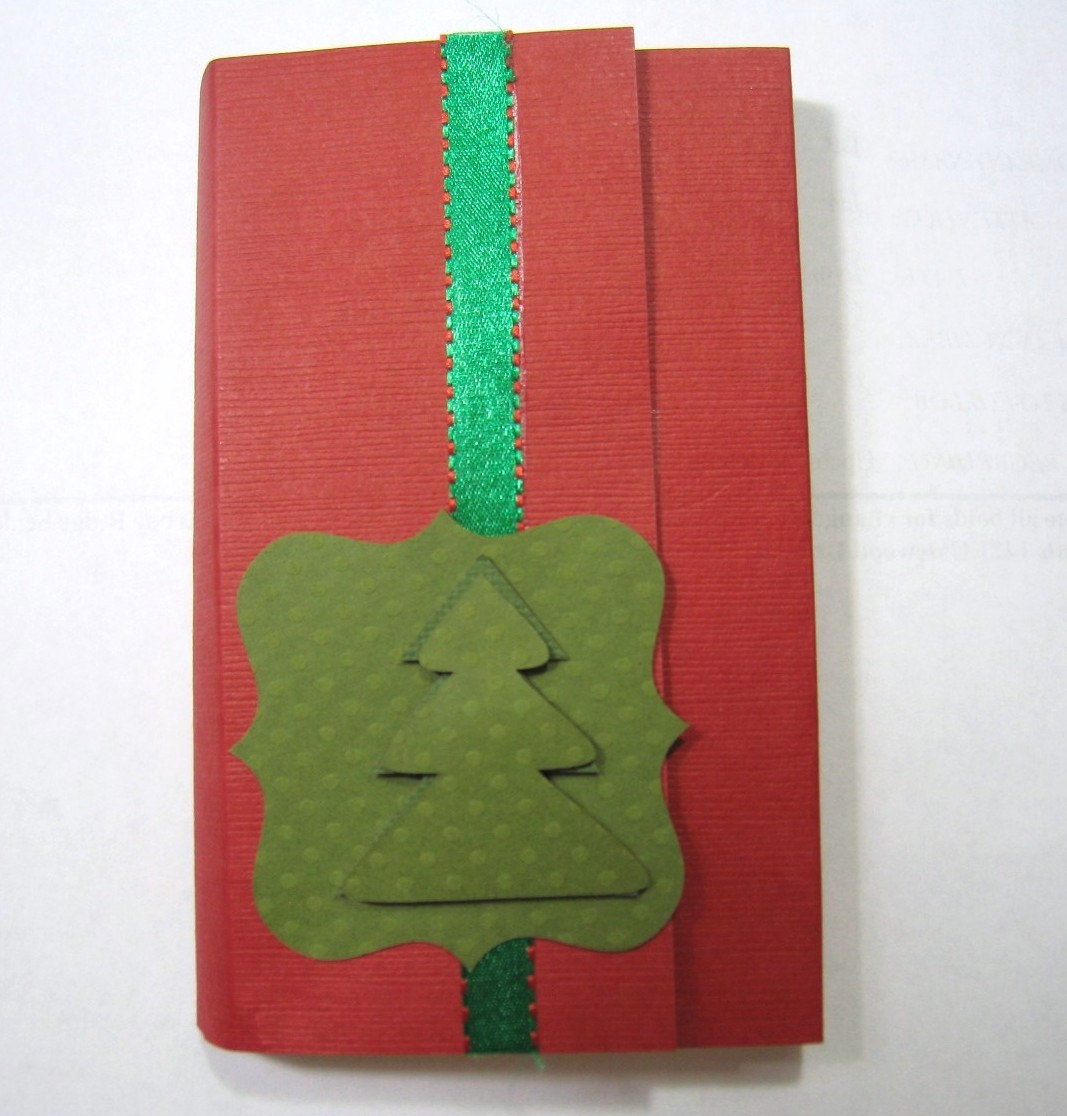
At the Scotch brand booth we made a make n take with some new products that I was really impressed with!! We made a simple cover for the 3x5 yellow post-it notes.


We used the pink ATG gun (my favorite tape gun!) to tape down the ribbon, the post-it notes and the green base shape. Scotch came out with a new adhesive pop-up dots that are different from other pop-up dots.


These have a liner on BOTH sides! It's great for when you know what you want to pop up but are looking to see where you like the placement of it. Since the back side is covered once you attach the pop-up dots (for example my trees in this case) you can lay them down where you think you want them, but unlike standard dots, since it's not glued down yet you can move them around to find what you like best. Such a simple thing, but it makes creating so much easier.
They also have the double sided glue squares, but they did something I never thought of. To close the note holder, we used a piece of scotch tape and put a glue square in the center of that.


Then we place another piece of scotch tape, sticky side up on top of the square and closed the holder. That way the alignment was perfect and the glue square keeps the holder closed.


When you open it, because you have scotch tape down, it doesn't rip your paper and it can be reused over and over until you run out of post-it notes!


Thanks for looking!

Monday, July 11, 2011

Circus Word Book

Good Morning!

This week on SweetSassyDiva's the theme our design team picked was circus. I picked doing a word book, I love making these! All my patterned paper used was DCWV and Core'dinations for the solid paper. I used my Cinch to put it all together.

I started out cutting the chipboard, the last page is 4 x 11. The first page is 4 x 3 (not counting the letter) and an inch more for each letter afterwards.


Next I cut out all the background papers and then flipped them to cut out the reverse side.


I used the Carousel lite cartridge and cut out the letters and their top layers @ 3 and glued them all down. I only did the letters on the front side.


The only thing that wasn't cut from Carousel was "It's A Circus" from Animal Kingdom, cut @ 2.5. I used design studio to hide the word circus. (Sorry for the blurry picture)


The dog was cut @ 3.5
The bear was cut @ 3.0
The house was cut @ 3.75
The elephant was cut @ 3.75
The lion tamer was cut @ 3.25
The lion was cut @ 2.25
The photo mats were cut at whatever size fit.


Thanks for looking!

Monday, July 4, 2011

Pooh Wall hanging

Good Morning and Happy 4th of July!!

My youngest son is making me a Grandma in January! They want to do the nursery in Pooh, but what started out as a mobile, turned into a wall hanging. LOL

I used the Carousel lite cartridge for the banner, cut @ 7.25 on the 24in mat. I used 2 yellow sheets of 12x12 paper and 2 pieces of 8 1/2 x 11 chip board. I just used scotch tape to hold the chip board together.


I inked the edges of the yellow paper and the chip board using Versa Magic pumpkin spice.

I cut the letters from Carousel @ 3 and the two Pooh's at each end of the banner @ 3.5. I punched two holes in the banner and used some rainbow ribbon to hang it up.
Tigger, Pooh, Piglet and Eeyore were all cut @ 5 from Disney Pooh Font Set.


Even though it didn't end up the way it started, I like how it turned out.


Thanks for looking!

Sunday, July 3, 2011

Welcome & Stars

Good Morning!

This week for SweetSassyDiva, the DT keyword was Stars and NO stripes! I decided to do a wall hanging. After 3 or 4 different ideas, I picked a round welcome sign. I LOVE the Stand and Salute cartridge, it was perfect for this project! I also used George and Winter Woodland. I used Core'dinations paper, my favorite paper for use with my Expression.

I cut 8 blue stars (from George) @ 4, 8 white stars @ 3.5 and 8 red stars @3.
From Winter Woodland I cut the word "welcome" @ 2.75 in blue and red.
From Stand and Salute I cut the words "Land of the free" @ 2.5 in all three layers. I cut out the fireworks @ 4.5 in all three layers.


I cut out the background shape from George @ 11.33 and 8.65.


I also cut out a piece of chipboard. Actually I used the back cover of a paper pack. I inked the edges with Versa Magic chalk in Night Sky and glued the two together.


I used the pop up dots from Glue Dots to the fireworks.


Next I put the stars together and added the layered letters.


I used the pop up dots again to add the stars to the circle and some thin blue ribbon to add the fireworks to the center.


Thanks for looking!