Monday, October 31, 2011

Tis the Season!

Good Morning!

Part of the requirement to join Sweetsassydiva's design team again was doing a Tis The Season project. For my project, I decided to do a Tri Shutter card with more non traditional colors.

Tri Shutter cards look like they may be difficult to make, but they really are super easy. You start out with your card stock cut at 5.50 x 12. Next you start at 1 inch down from the top and 2 inches in and cut a line to the 10 inch mark. Do the same thing again only 1 inch up from the bottom. Now you score your card at 2, 4, 8 and 10. It should look like the photo below.


I decorated my card using two different patterned papers, but you can use only one if you like. I also like to have my patterned papers to be smaller than the card stock. That's also a personal choice, so the sizes you cut depend on what you want your card to look like. I also used my color box chalk to ink the outside of light colored paper.


You can see the green borders once I attached my paper.


I did the same thing with the darker patterned paper, except the inking.


Now it's ready to decorate! Around my house, all winter long and sometimes even into spring, you'll hear me say "tis the season!" to my husband. He's a born and bred Texan! He moved to Wisconsin about 11 years ago and he's never totally adjusted to our winters. After the first winter, he's hated snow and the bone deep cold. So every time it's really cold or the snow flies, I just tell him "tis the season!" I couldn't resist making him a card with that saying on it. lol With the help of my gypsy, I was able to lay out several colors of paper on my mat to cut everything except the words.


I used Winter Woodland for almost everything.
The snow man and woman were cut @ 4.5 with their layers. I also used a black pen and stickles on them.

The mittens were cut @ 2. I used my Gypsy and hide the scarf. I used stickles and gems to dress them up.

The hat was also cut @ 2 and I used pink stickles on that one.

"The magic of winter" was cut @ 3, although I tweaked it a bit to fit in the boxes the way I wanted it to.

"Tis the season" was cut from County Life (my favorite for fonts at the moment!) at .75.

The stamp shape behind the words came from Sentimentals and was cut @ 2x 3.75.


Thanks Bobbi Jo for having me as a design team member again!
Thanks for looking!

Sunday, October 30, 2011

Monthly scrapbook pages

I scrapbook a page to start every month in my scrapbook. For me it makes it simplier than trying to find the date from a picture that I took, which could be from 6 months ago. Not to mention it's fun to scrapbook a theme page without a picture using the whole 12x12 space.


Thanks for looking!

Saturday, October 22, 2011

Fall/Halloween Challenge Hop!

Welcome to the Fall/Halloween Challenge Hop! The bottom of this post has links to see all the projects Pam's very talented Design Team has created!! Please stop by The Bugbytes if you haven't started out there, to see what Pam has going on!!

For my project, I wanted to stick with a fall theme. I also wanted to continue using my Flower Shoppe cartridge. (For those who follow my blog, don't worry I think I'm finally done using this cart for a little while. lol )FYI the scarecrow in the background was found at JoAnn's, at 50% off.


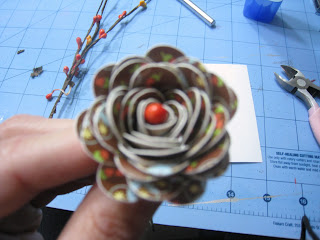
I used several different flowers for this project, but to save you from reading so much and me from typing too much, I used one flower with a lot of pictures to explain how I made it. They are all basically created the same way. So, let's get started! I started out with the scallope1, cut at 4.5 inches. I used my quilling tool, although you can use your fingers, a pencil, paint brush or whatever you happen to have handy. You start at the outside and roll with the top side of the paper inwards.


Continue rolling until you reach the small circle shape at the end. Tuck the circle shape underneath your flower and slowly let your flower unroll until you like the effect. If you unrolled too far, just re roll it and start again. I use glue dots, since I think they are the easiest, and put it on the circle shape and tuck it underneath my flower center. Next I take a sharp tool (in my case for paper piercing) and punch it through the flower and out the small circle.


Next I took some floral stem wires and cut them to about 6 inches each. I stuck the wire through the flower.


When I was at JoAnn's, I also picked up ... I have no idea what they are called! lol ... but you can see them in the last picture with the red and orange beads, for lack of a better word. I cut them off the stem and dropped some liquid glue down the hole I just made, on top of the stem, which is half way through, and placed the (in this case) red piece inside.


Now the inside of the flower is done, although in some of them I just used the inside piece and added stickles to it. Next I cut Fun4 at 2.5 inches, again I cut several different types. I took a glue dot and placed it on the small circle and attached it to the back of the flower.


In these photos I used Tombo clear glue, but a glue gun is easier. I took the outer piece of the flower and added glue to the center. I attached the top piece to the outer piece. I added more glue to the underside of the flower to hold the stem in better. I let them sit upside down for several hours. (It doesn't take that long for the glue to set, but I had a funeral to go to.)


Now comes the fun part! Before my hubby and I got married, we had been best friends for several years. He lived in Texas and I live in Wisconsin. I was going through a rough patch at one point and he knew it, so he sent me some flowers. The container I used is the same one he sent me, about 15 years ago. I've had dried flowers in it ever since the real flowers he sent me died. SO, I took red and orange ribbon and tied it around the top and then added a red bow.


I started with the scarecrow from JoAnn's, with Sassy's help, of course! I was able to save the scarecrow, but I lost a few flowers along the way.


From here on, it was all fun. It was just a matter of picking which flowers I wanted to add and where. Sassy helped with the decisions, as you can see! LOL


Thanks for looking!

I hope you enjoy all the projects in the Fall/Halloween Challenge Hop. Feel free to leave comments along the way, they are what keeps us inspired to keep creating and postings projects! Have a wonderful day!!

Pam from The Bugbytes
Lori from scrappinmystressaway
Jeannie from nonnasscraps
Audrey from cuteandsome
Kymberlee from thepapermidwife
Allison from goodybagdiva
Kelly from kamscraftyplace
Debbie from debseclecticthoughts
Carole from onmycraftroomwall
Elizabeth from 217creations
Kate from sassyandscrappykate
Mila from milamemories
Amylynne from amysscrappyspace

Monday, October 10, 2011

Fall Wreath and Floral Shoppe

Good Morning!

This week at SSD's the Design Team challenge is to create any sort of wreath and add of course some cricut cartridge in the mix. I thought it was a perfect time to use my Flower Shoppe cartridge and it was the only one I used.

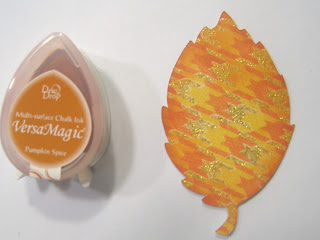
I started out with the leaf cut @ 4 and inked around the sides.


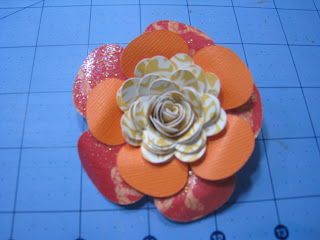
Next I picked out some patterned paper that I liked and started cutting flowers in all shapes and sizes. Making flowers has not been my strong suit, so I cut out a lot of them to mix them up and see what worked. (I have to admit, I'm happy with the results... finally! lol)


I also cut about a dozen of the swirled ones at 3.5.


And put together....

This one I cut @ 4.

And put together (Sassy approved! LOL)

I loved the scalloped ones, cut @ 3.5

This one was cut @ 4, 2.5 and 3 for the scalloped.

This one was cut @ 5, 4.5, 3, 2.5 and 4 for the sunflower center with stickles added.

The finished flowers!

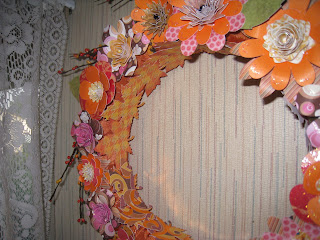
I used a 14in wreath from Hobby Lobby and covered it in orange ribbon, not the yellow pictured.

I also bought a spray from Hobby Lobby that cut apart and added to my wreath.

I used my glue gun and and put it all together. I'm rather pleased with how it turned out.


The inside of the wreath I covered in the leaves that I cut @ 4.

Thanks for looking!

Tuesday, October 4, 2011

Baby Banner

I made a banner for the 2 baby showers I'm hosting next month. The onesies were cut from Wrap It Up at 9.6. The letters and banner were cut from Country Life at 10. I picked up the clothes pins at Micheal's to "hang" up the onesies. I have no idea where I picked up the cute baby ribbon, probably Hobby Lobby.


Thanks for looking!